Makeup Banner

Showing posts with label tutorial. Show all posts

Monday, July 14, 2014

Get Kylie Jenner's lip look for UNDER 2 dollars!?


 I know everyone and their brother has been doing blogs and tutorials on Kylie's makeup for the last month or so BUT in true hug, kiss, makeup fashion I wanted to bring you how to get Kylie's lipstick look as cheap as humanly possible (and all while still being a great dupe!) sound good? GREAT, let's get into it!

So what product under 2 dollars can provide the Kylie's nude/mauvey/browny perfection you ask? Easy, Jordana's Lip Liner in "Rock n Rose" it is perfect on so many levels! It's a lip liner so you can line your lips and you can choose to over line them (the way Kylie does) if you'd like. It's matte, long wearing and it's so incredibly cheap! 

Swatch appears a bit more brown than it appears in person

You can purchase Rock n' Rose liner at Walgreens, Kmart and Amazon where it retails for just $1.99. Also, just a side note I recommend the entire range of Jordana liners they're long wearing, pigmented and simply amazing for the price point.

This swatch is more accurate! Photo cred: here.

What do you think? I think it's the perfect nude/dusty color and if you can't stand the thought of it being totally matte you can always add lipstick (I recommend Loreal's fairest nude) or even a gloss.

Thanks so much for reading and as always please share and subscribe!


Love, Leah
Follow me:  Google Friend Connect     |     Instagram     |       Bloglovin'


Monday, September 9, 2013

Review: Wet n' Wild Fergie LE Shimmer Eye Primer!


Hello beauties! I'm back with another review, I'm making sure to bring you this promptly since the Fergie Shimmer eye primer is limited edition! I believe it is exclusively at Walgreens, so if you are interested get your hands on it now while you can! Since the Wet n Wild "take on the day" original formula eye primer is my holy grail primer, I was so excited when I heard this was part of the fall collection! Note: this post is picture heavy!


The deets:

Wet n Wild Shimmer Take on the day Eyeshadow Primer
Claims: Prep & Prime, Lasts All Day, Never Creases
"Shade": A little party...
Amount: 0.34 fl oz
FYI, it is also cruelty free! :)

Just wanted to point out something I found rather interesting:


 I don't know if it was just the tube I bought but there was noticeably LESS product in the Shimmer formula primer compared to my original which has been used quite a bit. This kind of annoyed me, but I will probably be using the Shimmer formula less anyway (since I love matte shadows!) so it's all good! Just a heads up. Now on to swatches!


The color of the primer comes across as a shimmery champagne, almost rose gold color. But it also changes in the light it looks almost silver toned on the eyes. It's interesting and would look pretty cool just on it's own IMO!

Primer lightly applied on my eye without shadow. Note: you could get more color payoff if you used more product.
Next step was to test this baby out! First, I wanted to see if it was just as good as the original formula! So, on Saturday I primed my left eye with the shimmer primer and my right eye with the original.


Shimmer formula on left side eye, Original formula on right side & eye.

To the trained eye you can see it's definitely more shimmery on the left side, it's was even more apparent in person! I also used a matte shadow in the crease, so it will turn your matte shades into slightly shimmery ones from what I've experienced thus far. So I wore this look from about 10 am till 6 pm on Saturday, then our power went out (for the night!) and I had to make a mad dash to the shower before the built up hot water was gone! So here is the look at 6pm:

After 8 hours of wear! Left pic: Shimmer eye Right pic: Matte eye (L), Shimmer eye (R)
So after 8 hours there was no creasing or even fading! I knew the original formula could do that, no problem but I very happy to see that shimmer formula could do it as well!

So the next day I put the shimmer formula to the ultimate test: 12 hours! It was actually a little more than that but I had a busy day of family time and running around! So let's how the primer and my shadow fared!

Sorry about the different lighting 9am: natural light, 9pm: artificial light

As you can see there is no creasing! The bottom picture appears that the eyeshadow may of faded a little bit, but it is the difference in light source for the photo! I made sure to examine the shadow through out the day and it held up very well! Better than my eyeliner in some places as you can see from the 9pm picture lol

ignore my ratchet eyeliner haha

Over all I am very impressed! If you need a great, cheap eyeshadow primer I would recommend the shimmer and the original! If you're a glitter girl I would say you definitely want to try and get your hands on the Shimmer formula while you can! Any primer that can keep your eyeshadow on for more than 12 hours without ANY creasing, is a winner in my book.

What do you ladies think? Are you interested in the shimmer version? How do you think the eyeshadow wore on my lids? Please comment below and let me know :)

Thanks so much for reading, if you have any questions feel free to ask! Until next time,

Leah xo          Follow me:  Google Friend Connect     |     Instagram     |       Bloglovin'


·

Friday, August 16, 2013

Mac Brush Cleanser: the lazy way to clean your brushes!

Hello beauties! When I first started this post I was going to "label" it as a product rave, but as I was putting it together I realized the way I clean my makeup brushes really could be classified as the "lazy girls approach". Don't worry it still cleans, sanitizes & conditions your brushes ...just quickly & as painlessly as possible!

What I use:
Mac Brush Cleanser it's 15 dollars, 7.9 fl oz and it'll last you forever I've had mine for almost a year and I'm not even half way through with it [note: I use baby shampoo to deep clean my brushes, though].

 I find the Mac cleanser is gentle and user friendly, and most importantly it spot cleans brushes, amazingly.
Of course, some of you reading this are no newbie to spot cleaning brushes, but others may only deep clean their brushes, which everyone knows is time consuming & annoying. So ladies I'm going to show you how I spot clean my brushes and how simple & easy it really is!

What you need:
1. Your Mac brush cleanser
2. A small spray bottle {look at the dollar store or travel size section}
3. Paper towels or old towel {one you don't care about being stained}


Put some of  the cleanser into the bottle, whatever amount you'd like. Spray your paper towel (or towel) with the cleanser!


Take the dirty culprit, in this case I'm cleaning my blush stained mini stippling brush from elf (which is what use to apply cream blush!) and start swirling the brush in circular motions into the cleanser/paper towel.

Swirl your brush in circular motions!
Keep swirling! Don't be afraid to spray a little more cleanser on the towel if it doesn't seem damp enough {or if the brush doesn't seem to be getting clean}


And voila! Clean, pretty disinfected stippling brush! It seriously takes like 30 seconds to clean each brush! There is NO rinsing involved, which is great because you can save water :)

I do recommend that you deep clean your brushes when you can. I only do mine probably once a month and I know that's probably frown upon but I'm sorry it's the truth, haha.

So there you have it... the lazy, easy way to clean & serializing your makeup brushes! Thanks so much for reading, remember to subscribe {follow me on bloglovin' if you haven't} comment and share! Until next time beauties!

xo Leah
Follow me on:  Google Friend Connect     |     Instagram     |       Bloglovin'

Wednesday, July 10, 2013

Rimmel Show off: First Impression!


So as most of you beauties may know the UK based Rimmel apocalips lip lacquers have made there way over seas (as well as had a name changed) and landed in the US! I somehow did not know much about these before starting to see beautiful swatches on some of my favorite blogs/youtube channels, right away I was so impressed with how pigmented they seemed and decided I MUST get my hands on some!

Amazingly- my sweet future sister-in-law surprised me with the 2 I had be lusting over the most and made my whole day!
Left: Luna, Right: Celestial

Gorgeous aren't they!?
Luna- matte light peach, light coral (my new OBSESSION!)
Celestial- mauvy, dusty rose pink

And -hold on to your compact!- they are just as pigmented as they look! ...

With flash.
Natural light, no flash.
I can say these are FOR SURE the best lipstick/lip gloss hybrid I have ever tried! Usually, in my experience, extremely pigmented liquid lipsticks are drying or very uncomfortable on the lips. I found these to be extremely comfortable on the lips AND non-sticky, it truly is the best of both worlds! For me these last a considerable amount of time (around 4 hours). They also seem to leave a light stained affected, in a flattering way!

Where to buy: So far they seem to be limited to Wal-greens and are 4.99

Over all I think these are great and beautiful! I want more colors, they're all so pretty! Have you picked up any shades? Have any color recommendations for me? Let me know in the comments below!

Until next time my beauties! Please share, comment and subscribe!

xo Leah

Wednesday, July 3, 2013

A little 4th of July Glitter!


Hey beauties! Just wanted to quickly posted what I did to my nails for 4th of July, as I said in my last post I've been getting into to doing my nails more and thought this would be a fun & easy way to start off sharing with you guys! What are your plans for tomorrow? or even the weekend? I plan to spend it with my fiance and his family playing games, grilling out and of course fireworks! (that is if it doesn't rain on us, it's been raining ALL week in NC)

Breakdown of the Polish:

If you are unfamiliar with love & beauty it's forever 21's line of beauty stuff and they have a lot glitter polishes in some fantastic hues! Wet n' wild I recommend getting from Rite Aid or Walgreens and Sinful colors you can get at Walgreens & some Targets

And this is what I did!
Had to photograph it with a Viva Glam lipstick to be even more patriotic lol
I simply painted all my nails red, followed but the awesome royal blue glitter and I was going to stop there but I kept thinking about my awesome Fergie star polish and how this was the perfect opportunity to use it. I just did an accent nail of the star polish because it is difficult to manage getting the stars on the brush, usually end up just using my fingers to apply, haha

So I feel like it's a little tacky but I love it! A holiday is a perfect excuse to be alittle tacky anyway!

I hope I inspired any of you last minute nail do-ers to be a little festive with our Independence day and get to paintin'! Have a safe and happy 4th everyone!

Please comment, share & subscribe xo
Leah

Monday, July 1, 2013

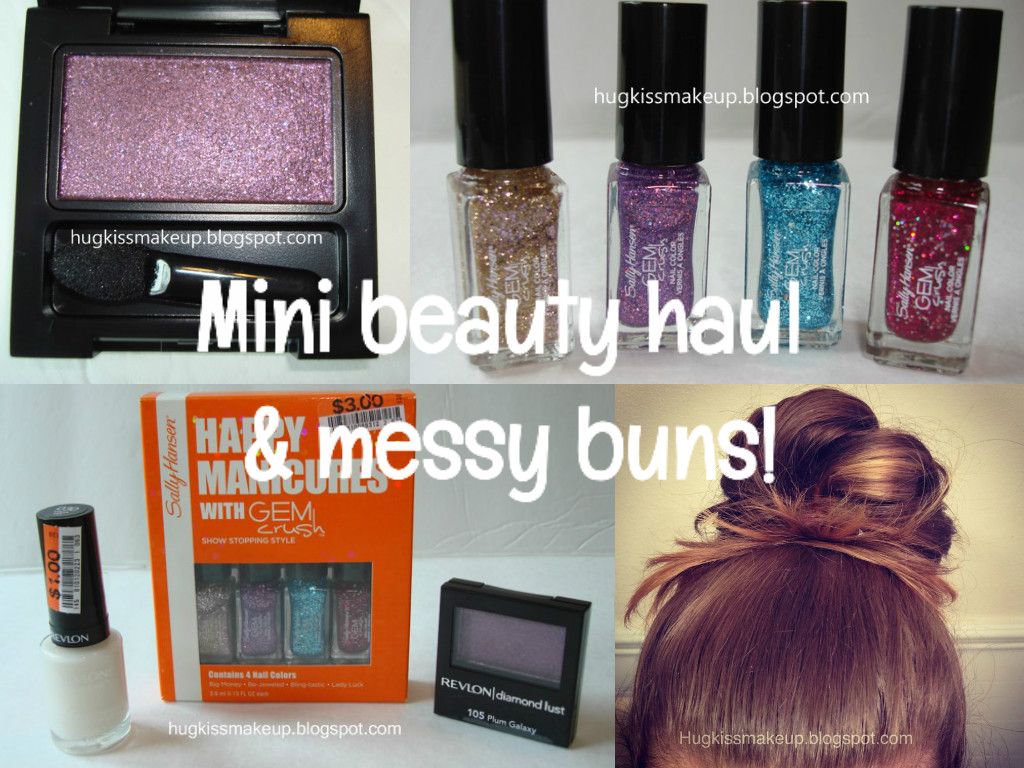
Bits & Bobs: Big Lots mini haul & messy buns!


As I said in my first "Bits & Bobs" post, I decided to start a semi-regular series little "bits & bobs" of things I've been loving recently, products I've used or purchased throughout the week, etc! That way I get to tell you guys the good the bad and the ugly of products and you can do the same (if you'd like) in the comments :)

So Saturday me and my other half went to Big Lots we had to get some spray paint to upcycle some thrift finds and of course I had to go down the beauty aisle (which of course I bee line to before stopping to look at anything else) and I only picked up a few items, I have to really refrain myself from buying more than I need. [and "need" is a term I use very loosely, haha] But, I LOVE what I picked up and of course the prices are so great! If you're not a Big Lots shopper, you can read more about my love affair with it in this post!

It doesn't look too impressive here, but the close ups are better!
First I spotted this Revlon "diamond lust" eyeshadow in 105 plum galaxy. I had seen this eyeshadow before regularly priced and just passed it up because I don't need it, but for a buck... what's not to love? Plus it's so freakin' shimmery, I'm a sucker.

2 different types of lighting, don't forget to maximize!
I still think it's beautiful, I just don't think it swatches quite as nicely as it looks in the pan, oh well it's a dollar!

Their nail polish selection was slim but I found really pretty polish by Revlon colorstay lined called "Calla Lily" it's a creamy ivory color with beautiful duochrome shimmer. Upon looking up the color, it's sheer but I think it'd be super nice over a nude or off white color.
This picture captures the shimmer accurately! photo credit: here.
Again it was a dollar, you can't beat it!

My last score is my favorite because I'm a sucker for glittery top coats and I got 4 of them for 3 dollars. It's a miniture set of the Gem Crush line by Sally Hansen {btw, fun fact: did you know that Sally Hansen isn't even a real women? It's just a made up name... that makes me kinda sad haha} They are all pretty unique colors that I don't have similar to!
love the different subtle color combinations!
They don't have any name on the bottles, or else I'd share that with you! But, I can't wait to use these bad boys, I haven't been into nails for a while and this gets me excited to do mine again. That ends my little haul... not bad for 6 something dollars with tax!

Also, I wanted to show you guys how I've been wearing my hair lately, I've been rockin' a messy bun like crazy. First of all, it's Summer and it's hot as hell not too mention I've been pretty low maintenance lately and it's so nice to not have to do my hair. I rather do my makeup over my hair anyday, that's just me!

What do you think of messy buns? Do you think they can be chic if you dress them up? Or do you instantly think of playing sports or hitting the beach? Let me know in the comments below.

Thanks for checking out my bits and bobs for this week! Please comment, share and subscribe! xo

Leah