Makeup Banner

Friday, September 6, 2013

H54F: Cosmetic Job Interview, Mac Dupe & more!


Hello beauties! I hope everyone had a good week and is looking forward to a fabulous weekend, this is my 2nd installment of high five for Friday {H54F} which, if you don't what that is, a lovely blogger by the name of Lauren Elizabeth recaps her week and encourages others to do the same! It's quite fun... plus I had some beauty related things happen to me throughout the week, so let's get started! :)

Wednesday I got a called from my dream beauty & retail job... Sephora! Wanting to know if I had time to interview on Thursday, uh... of course! I've been trying to score an interview there for months, so to say I was excited was an understatement! So I took pictures of the eye makeup I wore to the interview because I was really happy with the way it came out! I stuck to neutral eyes because I didn't want to be too over the top since it was an interview, but still wanted to show off some skill level! Haha

No edits/no filter

My shadows appeared slightly darker/more smokey in person, just an FYI. I was super happy with the way it came out and I was really impressed with the false lashes I used, they are pretty natural and looked great!

How to get the look:
[Maximize for more detail!} L to R: Wet n Wild Vanity Palette, Wet n Wild "walking on eggshells", Mac's naked pigment

1. First I used middle shade on the left side of  Wet n Wild's Vanity palette  it is a light brown matte shade and I applied this in my crease, I know a lot of people do their lid color first but I've found I can blend things out easier and get a better effect if I apply my crease color first {I can always add to it along the way if I want} it's just what works for my slightly hooded eyes!

2. Next I applied the eyelid shade of Wet n Wild's walking on eggshells trio {on sale right now at Walgreens for 2 dollars!} to my eyelid, this is a gorgeous slightly pink champagne shade a supposed dupe for Mac's Naked Lunch I believe!

3. I then went back to the Vanity Palette and applied the dark matte brown shade on the bottom left to the outer v of my crease and outer lid as well.

4. I then took Mac's Naked pigment on a slightly damp flat shader brush and applied this just to the center of my lid to add some extra sparkle and dimension, I HIGHLY recommend doing this, it really brightens and opens up the eye. A good drugstore alternative to this I think would be L'Oreal eyeshadow in Iced Latte.

5. Next I popped a little bit of the matte cream shade in the Vanity palette right below my eyebrow for a highlight, then I couldn't help but to put a tiny bit of the naked pigment there as well!


6. I then used Jordana's Metal Rocks Eyeliner in "Purple Prism" on the outer half of my bottom lash line, the color is more of a dusty plum with slight shimmer. It's so pretty and extremely long lasting {12+ hours without coming out or smudging!} It's one of my absolute favorite pencil eyeliners and it's 3 dollars!

7. Then I used my Revlon Precision Lash Glue {which is great because it has a tiny brush to brush the glue directly ON the lashes!} waited 30 seconds for the glue to get tacky and applied Modlash Andrea 21 false eyelashes with little to no problem! These lashes are great if you are looking for something more natural or you have smaller set/slight hooded eyes because they do not over power or eye or hide all the work you put into your eyeshadow!


What do you ladies think!? The lashes gave me an extra boost of confidence since I rarely wear them, but if I get the Sephora it would be the perfect opperunity to wear them regularly! Btw, I think the interview went really well, the manager I interview with was super nice and friendly, so cross your fingers for me! :)

Mac Lipstick Dupe!:

I accidentally discovered a Mac lipstick dupe yesterday, I swatched Milani's Plumrose and instantly thought of  Mac's Craving sure enough when I compared them side by side they're pretty much identical! I know the Milani shade looks a bit lighter in the picture, but trust me it's just the lighting! This is the perfect berry, plum shade for fall I'm so glad to of found a cheaper dupe!
Mac swatch on top, Milani on the bottom

 That about wraps it up ladies, I hope all of you have a super stellar weekend! Please let me know what your think of my interview makeup look in a comment! Until next time,

Leah xo          Follow me on:  Google Friend Connect     |     Instagram     |       Bloglovin'


· ·

Monday, September 2, 2013

A lesson learned from finding makeup dupes on the Internet!

Hello beauties! Hope all of you had a wonderful weekend and holiday if you're in the US... I did with my family and mah main squeeze! On to the post ... if you know me you know I'm a makeup dupe freak! I make lists of them, I post them almost daily on my Instagram {follow me!} and I will also have SEVERAL prepared makeup dupes/alternative posts coming up this month, so be on the lookout! {Lots & lots of Mac dupes, ladies!} But, along with the searching for dupes, the excitement of finding a new dupe comes this: slowing finding out that lots of "supposed dupes" you find on the internet for high-end items, are not dupes at all. Does this infuriate anyone else but me? I. don't. understand. It's bound to happen, I guess and it just happened to me ...TODAY!

I was researching different products last night and pretty much stumbled across how a 3 dollar e.l.f. blush was a dupe of the 28 dollar Benefit Coralista. This instantly got my attention, because 1. I (the drugstore queen) actually have a smaller sample size of Coralista to compare the e.l.f. one too and 2. I know what a popular brush this among makeup lovers so I thought this would be GREAT dupe to report! So, I went out to Target and picked up Candid Coral blush by e.l.f. ...truth is, I have no idea why I haven't bought this blush earlier, I'm obsessed with coral makeup. I just always assumed it was the same blush that was in their Contouring Blush & Bronzer duo because they looked similar... but this is not the case!

Anyway, I got the home with the e.l.f. blush and instantly opened it and I was excited because looked very similar to Coralista in the pan!

Left: e.l.f. candid coral Right: benefit coralista

Looks good, right!? Looks really, really good. But then I swatched them...

Left: e.l.f. candid coral Right: benefit coralista
Turns out... they're pretty freakin' different. candid coral is much more coral and has a beautiful golden iridescence, almost duo-chrome & coralista is more frosty and definitely more baby doll pink. Honestly, this made me dislike Coralista even more... why is it called coralista if it's a baby doll pink? I don't get it and honestly, I think it's overrated haha. ANYWAY, it is truly crazy how these blushes look so alike in the pan and so different swatched... they really aren't comparable at all once swatched.

So the lesson learned is always do your homework before believe or reposting a dupe, unless you see swatches side by side, I'd proceed with caution in actually believing something is a dupe for something else! Unless, of course, it's a friend or blogger your really trust, etc.

I hope this was helpful to you ladies, it certainly was a learning exprience for me! BTW, if you don't have candid coral I do recommend getting it for 3 dollars {obviously, I just got it today} but it looks utterly gorgeous swatched. Until next time!

xo Leah                Subscribe via GFC | Follow via bloglovin' | Follow on Instagram!

· ·

Friday, August 30, 2013

High five for Friday: Weekend Plans & Travel Makeup Bag!


Hello beauties! Just wanted to pop in and quickly ask you ladies what are YOUR plans for Labor day and the long weekend!? My fiance and I are heading to my annual Labor day family reunion. I know... it doesn't sound too fun, but it actually is! My extended family rents out a Summer Camp {which is now closed for the season} and there are cabins, a pond to fish/boat in, animals to ogle over and the whole nine! So over all, it's pretty cool, plus I get to see people I don't get to see too often!

I wanted to quickly show you a peek into my travel makeup bag! We're only staying one night so it's not too full, I am a crazy over packer so, this amount is amazing for me haha


I'm just going for the essentials and most of these items I've mentioned in previous posts! 

I will share my thoughts on a few things I haven't mentioned before! 

  •  Rimmel Glam'Eyes Mascara I liked this mascara for a long time, I've just sort of rediscovered it recently, not only is the packaging adorable but it performs pretty well too! It's got a comb-like brush so it great at separating your lashes, it lengths decently too. My only small complaint is that I wish it held a curl better, but that's usually always a problem for my lashes!
  • Covergirl & Olay concealer, this stuff is magic in a pot, I'm pretty sure it's being discontinued because it's been on clearance at several stores I've been to, but if you can find it I highly recommend it!
  • Rimmel lip pencil in "eastend snob" it's a great staple pale pink color, I find it goes great with pretty much any shade of pink lipstick AND coral {which has been my favorite of the summer!} 
  •  Wet n Wild Vanity Palette {pictured under the "walking on eggshells" trio} this six pan palette is absolutely great, I HIGHLY suggest you get this if you don't own it! It's limited edition so it is hard to find, but that link that I listed has it for 11 dollars & free shipping. I know that a little expensive for wet n wild, but considering every single color is a Mac dupe, it's still very much a bargain in my book!
 Please comment if you want details on anything in my travel makeup bag that I didn't mention!

 I hope all of you have a safe, fun and wonderful Labor Day weekend, until next time

xo Leah
Follow me on:  Google Friend Connect     |     Instagram     |       Bloglovin'

Tuesday, August 27, 2013

Makeup look for less: Taylor Swift VMA's

If you caught the 2013 MTV VMA's on Sunday I bet you couldn't help but notice how elegant and classically beautiful Taylor Swift looked... am I right?! I love the gray smokey eye and darken red lip, so I thought I'd show all my lovely readers how to recreate this look using drugstore makeup products! This look would be perfect for a special occasion or a girls night out. So, let's get in to it!


1. Covergirl Outlast Foundation I simply cannot say enough good things about this foundation. It lasts longer than anything I've ever used, it is absolutely perfect for a long day, or even a sweaty night of dancing! You can read more about my thoughts on it in my summer essentials post , I have put this stuff to the test and it truly is impressive! Plus I thought it was super fitting I used a CoverGirl foundation, considering Taylor herself is a Cover Girl! Cost: $9-12

2. E.L.F. baked blush in "Pinktastic". If you notice Taylor has minimal product on her cheeks, it almost looks like she skipped a blush all together and just used a pink/silver highlight on the top of her cheek bones. Pinktastic is a great way to achieve just a slight shimmery, pink look and if use with a light hand could be used as just a highlight instead of a blush. The elf baked blushes are long wearing and extremely pigmented, they are a great alternative to the Mac mineralized skin finishes. Cost: $3

3. Physican's Formula Quad in "Canyon Classics" This palette is absolutely fantastic, it can work as double duty to fill in your brows {if you have brunette hair or lighter} and the gorgeous matte grey shadow is PERFECT for recreating Taylor's smokey eye! I know what you're thinking... "Leah there is a ton of glitter on her eyes, they're not matte!" Don't worry, #4 takes care of the glitter, just apply the matte shade all over the lip up into the crease and smudge it along the lower lash line. If you want a little more definition put the lightest color in this palette in the inner tear duct area and right below your brows! Cost: $7

4. Femme Couture glitter eyeliner in "Chain Reaction" This is a liquid brush on glitter eyeliner in silver. Now I know that glitter can be intimating for some people, but I think the tiny brush applicator on this wand offers a great amount of control, so the application isn't messy at all {hallelujah!} To get Taylor's look apply the eyeliner right under your lower lash line & in your inner corner. If you're glitter maven, however, by all means... go nuts! Haha {Note: I know that NYX used to make a silver glitter eyeliner too, but I couldn't find it anywhere... not sure if it's been discontinued.} Cost: $7

5. Maybelline Cat Eyes Mascara , I love this Mascara! Not only is the packaging adorable {I'm a completely sucker for leopard print!} but I think this formula is long lasting and holds a curl very well. The curved brush helps my stick straight lashes to curl better, even after curling them with an eyelash curler. Also, it isn't a HUGE brush like a lot of mascaras tend to be now-a-days, so it works very well at getting your bottom lashes without smudging/making mistakes. You can always pop on a pair of false lashes if you want a bit more drama, Taylor didn't look like she was wearing any {if she was they're semi-natural}. Just make sure you curl first and apply at least 2 coats for that dramatic look! Cost: $7-9

6. NYC lipstick in "Sheer Red" this lipstick is absolutely gorgeous, plus for a red... it's such an easy to wear red! It's tad bit darker than your classic "retro red", so I thought it would be perfect for Taylor's look. If you're a little intimidated about wearing a red lipstick just apply this lightly, I almost guarantee you'll like it! It's flattering on so many skin tones, and guess what it's only a buck!? That's right 99 cents. If you're going out for a long night try and apply a lip liner first to increase the longevity of wear. Cost: $1


There you have it an easy, cost effective way to achieve Taylor Swift's VMA makeup look FOR LESS! I really think this is a perfect look for a sexy date night or a special night out! Please let me know if you plan on trying this look out AND what was your favorite celebrity look of the night. Thanks for reading, don't forget to subscribe!

Until next time! xo Leah
Follow me on:  Google Friend Connect     |     Instagram     |       Bloglovin'


Sunday, August 25, 2013

Beauty Bargain Review: ELF Mineral Infused Mascara

Hey beauties! I'm back with the second installment of "beauty bargain review" my review series on exactly that... bargain priced makeup! As of late I've kind of been on a mascara buying kick lately. I was getting slightly bored with my current mascaras, you know... when you just feel like mixing it up! So I started exploring the Makeup Alley website {which, if you don't know... is a makeup junkie's dream for reviews of products!} I searched mascaras that were top rated and I was surprised and immediately curious when I saw the e.l.f. Mineral Infused Mascara was one of the top drugstore options, with 80% of reviewers saying they would repurchase again. I thought for 3 dollars, it's gotta be worth a try!


The eyes, lips, face website describes this e.l.f. mineral infused mascara as: "The top rated Mineral Infused Mascara creates fuller, healthier looking lashes. Enhance lashes for a naturally thicker and more volumized look. The long-wear formula and unique silicone brush creates a clump free and defined application for gorgeous lashes all day." List of ingredients here if you're interested.

First Impressions: 
The brush is a rubberized, not your standard bristle-type brush. It has lots of little teeth for separating your lashes and to prevent clumps from forming. It is a pretty wet formula, those who prefer drier formulas, may not enjoy that. The tube opening is good at take away the extra product from the brush though, so there isn't too much mascara on the wand.

Application:


I thought I would start with a picture of my bare lashes, they are pretty short and hard to curl, definitely nothing to write home about!

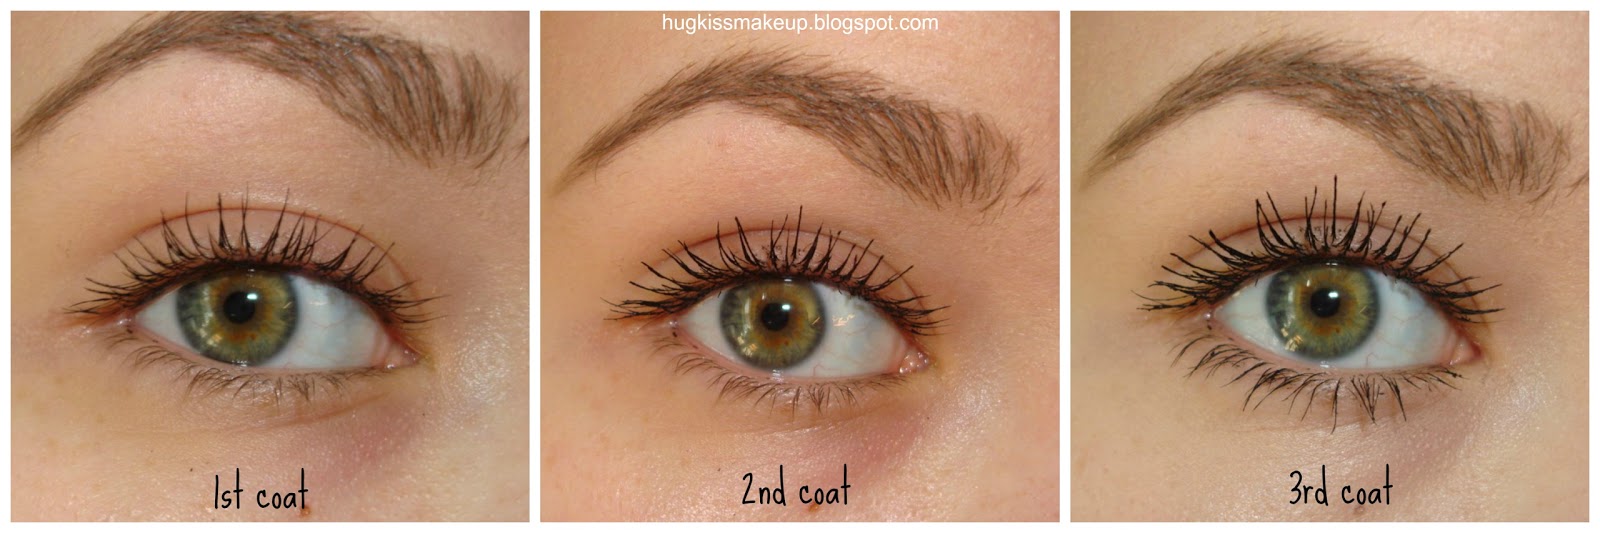
Maximize to see details better!
The only "prep step" I did was curl my lashes with the amazing Lancome Eyelash Curler {I highly recommend this if you're looking for a good "upscale" eyelash curler}

1st coat: brush combs thoroughly through my lashes separating them, giving pretty good length and curl but not a lot of volume.
2nd coat: continues to length and gets some volume and curl, does a good job at not clumping {my eyelashes clump VERY easily!}
3rd coat: I probably could of done without the 3rd coat I got a few clumps, but for my lashes clumping as easily as they do, the clumping was VERY minimal and the length was pretty darn good. I doubt this mascara would clump at all on most people.

I found the lasting power to be perfectly fine, no flaking or running. I've worn it several times and had no problems.

The only thing I am slightly disappointed in is the lack of volume in this mascara, especially since elf advertises it as be voluminous. I've found if I use an eyelash primer before hand I can get a little more thickness out of my lashes, so that's a tip!


Value 5 out of 5 / Lasting Power: 4.5 out of 5 / Lengthening 4 out of 5 / Volume: 3 out of 5

I highly recommend checking out this mascara if you like in the market for any of the following: an inexpensive, lengthening, clump-free (pretty much), wetter formula, rubber brush mascara!

Thanks so much for reading ladies! If you have any additional questions about the mascara {or anything!} please comment below, until next time!

xo Leah

· ·

Tuesday, August 20, 2013

Get that famous "Jlo glow" using drugstore makeup!


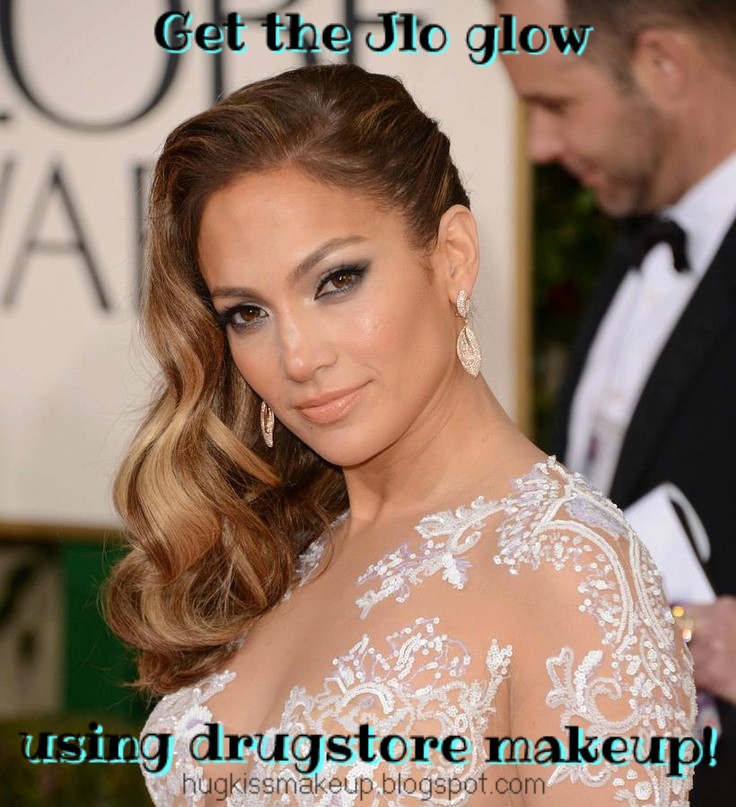
Most ladies {whether you're crazy about makeup or not} know about the Jennifer Lopez's famous "jlo glow" it is one of the most talked about looks in makeup and Jennifer's makeup artist Scott Barnes made the look famous on Jennifer. It's super iconic and it's easier to obtain than you may think! I'm going to share with you great products to achieve this look available at the drugstore {including several high end makeup dupes}!

Now I wouldn't advise you to necessarily use ALL of these products are the same time, but some in combination would give a great glow to your face, eyes and lips!


1. L'Oreal True Match Lumi This foundation is a light to medium coverage that gives your skin just that little extra glow. Don't fret though, there are no "visible shimmers" so you won't end up looking like a disco ball. It's a natural healthy finish, with that little extra "something". I'd recommend applying it with a beauty blender {or a cheaper alternative} sponge so you get an absolute flawless finish. I have heard people with very oily skin don't have a lot of luck this foundation, so just be aware of that! Another alternative would be to get something like Mac's Lustre Drops added to your favorite foundation will do the trick as well!


2. NYX Cream Blush in "tickled", the blush is absolutely gorgeous! It is hands down my favorite cream blush, see my swatches of it here. It reminds me of Nars Orgasm in cream formula, in which it's a pinky peach with great golden shimmer. It gives off an amazing sheen and almost iridescent quality. Again, it's not over the top and it's a great user friendly cream blush. Trust me, once you buy this blush you'll find yourself using it again and again.


3. Wet n Wild Bronzer in "ticket to brazil" first and foremost this baby is a dupe of the shimmery version of the Tarte Park Avenue Princess bronzer! {Picture of the comparison on my instagram here , make sure to follow me too!} It's a gorgeous shimmery golden bronzer and it'll last forever, it's 23 grams of product! It's great to add a glow or to lightly contour the hollows of your cheekbones. This is quickly becoming my holy grail product when it comes to a shimmery bronzer.


4. Hard Cany Highlighter in "tiki" this product has quickly become a cult favorite in the beauty blogger/guru community and there's not doubt as to why, it's really good stuff. It has been compared to high end highlighters like a the balm's Mary-Lou Manizer or even the coveted Dior Amber Diamonds, I can't say for sure if they compare because I don't have the high end counterparts. All I know is it's a beautiful champagne, light yellow based highlighter. It's perfect for dusting on the top of cheekbones, placed on the inner tear duct of the eye or on the brow bone. It brings just the right amount of light and life to the face.


5. Wet n Wild trio in "Walking on Eggshells" Let me start off by saying, I just can't get enough of this trio. I put off getting it for so long because I kept telling myself you have enough neutrals. I finally caved when Wet n Wild was 30% off at Rite Aid, so I paid less than 2 dollars for it. Let me say I'd pay way more money for it, these shadows are so pigmented and buttery. Also, a bonus all 3 shades are Mac dupes: the highlight shade is a dupe for Mac's "shroom", the bronzey/brown shade Mac's "tempting" and the champagne/peachy shade Mac's "all that glitters". Use these shadows together or separate to create a great bronze, shimmery eye.


6. L'Oreal Lipstick in "Peach Fuzz" This lipstick is so pretty, it's a great shimmery peach shade. It's almost frosty, but don't be afraid it's not your "grandma's frosty lipstick" It's great at adding light to the lips, while adding a peachy sheen. See swatches in this post. It's rather subtle really, and can be used to amp up a darker lipstick or topped off with gloss for a super pretty shimmery lip. It's definitely a must have for you coral lovers out there!

There you have it! A list of some outstanding drugstore beauty items that you can use to get that famous "Jlo glow", see go forth and be that bronze goddess I know all of you can be! Haha. Until next time my beauties, please comment, share and subscribe!

xo Leah
Follow me:  Google Friend Connect     |     Instagram     |       Bloglovin'

· ·

Friday, August 16, 2013

Mac Brush Cleanser: the lazy way to clean your brushes!

Hello beauties! When I first started this post I was going to "label" it as a product rave, but as I was putting it together I realized the way I clean my makeup brushes really could be classified as the "lazy girls approach". Don't worry it still cleans, sanitizes & conditions your brushes ...just quickly & as painlessly as possible!

What I use:
Mac Brush Cleanser it's 15 dollars, 7.9 fl oz and it'll last you forever I've had mine for almost a year and I'm not even half way through with it [note: I use baby shampoo to deep clean my brushes, though].

 I find the Mac cleanser is gentle and user friendly, and most importantly it spot cleans brushes, amazingly.
Of course, some of you reading this are no newbie to spot cleaning brushes, but others may only deep clean their brushes, which everyone knows is time consuming & annoying. So ladies I'm going to show you how I spot clean my brushes and how simple & easy it really is!

What you need:
1. Your Mac brush cleanser
2. A small spray bottle {look at the dollar store or travel size section}
3. Paper towels or old towel {one you don't care about being stained}


Put some of  the cleanser into the bottle, whatever amount you'd like. Spray your paper towel (or towel) with the cleanser!


Take the dirty culprit, in this case I'm cleaning my blush stained mini stippling brush from elf (which is what use to apply cream blush!) and start swirling the brush in circular motions into the cleanser/paper towel.

Swirl your brush in circular motions!
Keep swirling! Don't be afraid to spray a little more cleanser on the towel if it doesn't seem damp enough {or if the brush doesn't seem to be getting clean}


And voila! Clean, pretty disinfected stippling brush! It seriously takes like 30 seconds to clean each brush! There is NO rinsing involved, which is great because you can save water :)

I do recommend that you deep clean your brushes when you can. I only do mine probably once a month and I know that's probably frown upon but I'm sorry it's the truth, haha.

So there you have it... the lazy, easy way to clean & serializing your makeup brushes! Thanks so much for reading, remember to subscribe {follow me on bloglovin' if you haven't} comment and share! Until next time beauties!

xo Leah
Follow me on:  Google Friend Connect     |     Instagram     |       Bloglovin'